ED Tech 336 Blog

Category: Free Inquiry

Final Wrap-Up for EDCI 336

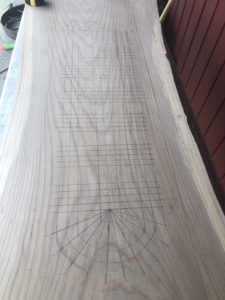
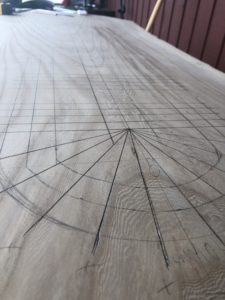
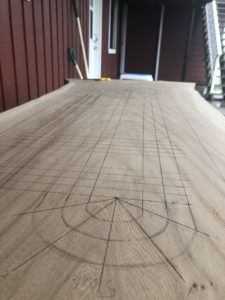
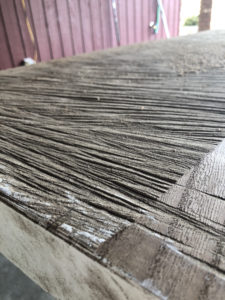
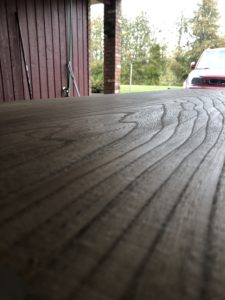
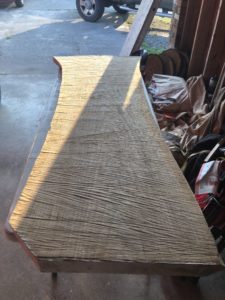
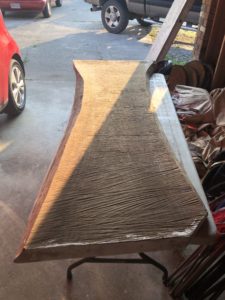
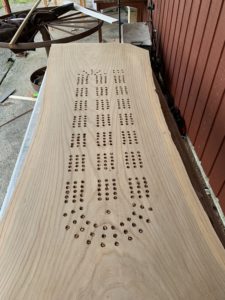
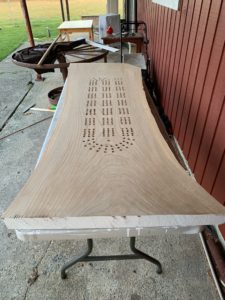
Well, where to begin. I wanted to create a beautiful crib table, I had big ambitions. Unfortunately it did not quite turn out the way I wanted it to, I started with a large slab of Elmwood and worked with it the best I could. I honestly thought I could complete this project by the time the semester had ended but unfortunately I could not. Sometimes things happen, and we don’t quite finish what we start by the initial date we set. I wanted to create this table because my grandfather taught me how to play cribbage and I thought it would be a nice piece of furniture that we could have had on our outdoor patio. I cannot express how much I wanted to finish this project by the end of the semester but circumstances did not allow for it to happen. The grandfather that taught me how to play cribbage has become quite ill, it has taken its toll on myself and my family and I have struggled with trying to complete the project. I will eventually finish it and give the table to my dad to remember his dad. Here is a picture of how far I got on my project:

Although I was unable to finish the table I really enjoyed the process of making something with my hands for a school project. Being in university it has mostly been about writing essays and papers and using mostly books and technology to complete tasks and projects. This inquiry project has allowed me to use my hands to build something for my family (or at least get a start). My project has also taught me a few things about myself, I have major OCD when it comes to these types of projects, I hate making mistakes, and I love building things. I really appreciated the opportunity to something outside the realm of academia that counted towards are grade in this class. I will complete this project and I honestly think I will continue to blog throughout my career as a teacher, I liked blogging. As someone who is shyer than most blogging has given me the opportunity to speak my mind, it takes me a little longer to articulate my thoughts. Blogging may also be useful in my future classroom, just as a way of formative assessment of students and keep in touch with how they are doing in the class, how they perceive certain topics etc. Anyways, thank you so much for this class, I really did learn a lot and I learned a lot about myself too!

Drilling Holes for the Cribbage Board and More Sanding!

This past week I finished drilling the holes in the slab for the cribbage board playing area. I used a handheld drill and a 1/2″ drill bit to drill the holes. For anyone that knows the game of cribbage they know that there is 121 pegging holes, the 121st hole is the winning pegging hole. The other 120 pegging holes are part of the regular playing area. There are three rows so three people can play the game, therefore I had to drill 361 holes in total, so you could say my hands are a little sore.

I learned quite a few things about myself and woodworking this past week. The first thing I learned is that my OCD is real. The second thing I learned is that I am not a professional woodworker and my project will not be perfect and I will have to live with that fact.

What does this mean?

I bought a little tool from Canadian Tire that helps drill straight holes up and down which works perfectly. The problem was with keeping the holes in a straight line on the playing area. Some of the holes I drilled were off-center from the lines I had drawn on the slab. I had also not accounted for the 1/2″ holes that would be created by the drill bit while I was measuring the spacing originally so some of the holes have chipped away some wood (photos below). These little mistakes really frustrate me, I often tend to move to quickly for my own good and miss steps and make mistakes. I keep learning these things about myself through projects, the blogging I think reaffirms these things though, by having to reflect about my learning and the process. The next step of the project will be to finish sanding the slab, stain it, and then create legs for the table. I have an idea of what I will be doing for the legs but I will keep that for another day to explain.

Sanding and Marking the Crib Board

Tools Used

For this step of the project I used an industrial thickness sander (at my brother’s shop) and an orbital sander. An industrial thickness sander is a machine that has a track that carries the piece of wood through the machine. Above the track there is a sanding belt, this machine allows me to sand more material off of the slab than an orbital sander would. After using the thickness sander we used the orbital sander with a finer grit of sand paper to make the slab smooth, the finer the grit of sand paper the smoother the slab becomes. In the thickness sander we used a grit of 60 and then 80, we then switched the belt out for 120, the numbers refer to the size of the abrasive materials on the sand paper. After we were done using the thickness sander we used the orbital sander to finish it up a little and make it a bit smoother with 150 grit. This process made the wood smooth enough to mark where I will be drilling the holes for the cribbage board.


The Slab Running Through the Thickness Sander

My Little Brother Sanding the Slab

Drafting the Cribbage Board

With the slab smoothed enough to draw on the face I marked out the cribbage board area and where I will be drilling the pegging holes. Because of how large the cribbage board is going to be I could not find a stencil online to simply trace, because of this I had to mark out the playing area myself. I used a left over piece of a baseboard as a straight edge to mark the three rows that are on a cribbage board. I made the length of the lines so that between each pegging point is 3/4 of an inch and every five pegging points there is a larger space to make counting easier for the player, I made that gap 2 1/2 inches long. This was somewhat easy, the difficult part was drawing the turns on the crib board. I had to free hand these, I am hoping when I do drill the holes it looks okay. Next week I will be drilling the holes, cutting the ends of the slab and finishing sanding.

The Whole Playing Area Marked

The First Corner of the Cribbage Board

The Second Corner of the Playing Area

What is Planing?

It was brought to my attention by a peer that not everyone reading my blogs has the background knowledge of wood working. People reading the blog posts may not understand the terminology that I am using to discuss the processes of making my project. Before I go any further with my Free Inquiry Project I want to dedicate a blog to explain some techniques and terminology that I have used and will use future posts. From this point forward if I use a specific term I will spend time to explain the term and its relevance.

Planing

Before you sand a piece of wood sometimes it is necessary to plane the wood if it is extremely rough or uneven. In the case of the slab I purchased it was extremely rough from the saw marks and very uneven, so it was necessary to plane the piece. There are few different types of planers there is a planing manual hand planer, an electric hand planer, and a planing machine. The purpose of planing is to create a smooth surface and to remove larger amounts of material than a sander. The electric planer and planing machine use a rotating blade to remove material whereas the manual planer has a straight blade with a smooth bottom and a grip on top to run it over the surface of the wood.

Here are the examples of the three types I have mentioned:

Plane (tool) - Wikipedia

Hand Planer – From Wikipedia, https://bit.ly/2H6jeDM

Mastercraft 6.3A Portable Hand Planer Canadian Tire

Electric Hand Planer – Image From Canadian Tire,  https://bit.ly/2H9Y9rF

Industrial Planer – Image From King Industrial, https://bit.ly/3k50zGM

The type of planer I used was the hand held electronic planer in the second photo, the piece of wood I have is too large for the manual hand planer and too wide for the industrial planer that is at my brothers shop. The handheld electronic planer was the only optional that was suitable for this project. The planer I bought is only 3 1/4 inches wide so planing the wood was tedious but definitely easier than using a manual planer.  My next blog will be discussing the sanding process and the rough draft of the layout for the crib board.

Hand Planing the Slab

“Hand” Planing the Slab

As you can see I put quotation marks around the “hand” in the title, this is because I used an electronic hand planer, not an original hand planer which would take much longer than the method I used. Unfortunately the slab I have is too big to run through the thickness planer at my brothers shop, that would be the easiest method, however, that is out of the question. Before I do anything I want to get rid of the band saw marks that have carved up the slab (First Image), the band saw marks are quite deep and obviously make it hard to create a flat surface. This process took a few hours to really make sure all the marks are removed.

The Saw Marks on the Left and the First Pass with the Hand Planer on the Right

This is a Quick Video of Myself Planing the Slab

The Surface of the Slab After Being Planed

Now that the slab is relatively smooth I can begin to create a level surface on both sides of the slab.  In order to make a level table I need to start with a perfectly flat table-top. I have given this quite a bit of thought as to how I can do this, I am thinking that I may have to create a stand that I can place the slab on. The stand will include rails on either side of the slab, these rails will act as glides for the jig I will build to run a router over the slab to really ensure the slab is flat. This is just a possible solution I may have to use if I cannot think of anything else. Here is a picture of a similar setup that I would have to build:


First Steps of the Free Inquiry

On October 1, 2020, I found the slab of wood that I will use to build the table. I have a friend that works at West Wind Hardwood in Sidney, B.C., I messaged him and asked if they had any nice slabs of maple or cedar in the price range I had allowed for myself. He told me they had a six-foot-long, twenty-one inch wide and three inch thick piece of maple that I would be able to purchase. So I called West Wind to place the order so the piece of wood could be pulled from the inventory, however, when I called the slab I was calling about did not actually exist. The person on the phone informed me that the dimensions I was describing to him were for a piece of elm not maple. I told him I would call back in a bit after I did a bit of research on elm wood for inspiration and to research about the workability of the wood. After my brief research I decided that based on the price, the time crunch, and the inspiration I saw I would buy the piece despite it not being any of the species of wood I wanted.

Here are the pictures I took of the slab when I brought it home:

Over the next week I will be taking the slab to a work shop to flatten both sides. I would use a hand planer but feel that if I have the access to a shop I should use that resource instead of making it more difficult for myself. After the slab is flattened I will begin to sand it and map out the cribbage board area using a stencil to ensure accuracy of the holes that will be drilled. I am really looking forward to working on this project. I will also provide a link to West Wind Hardwood where you can purchase unique woods for your own projects.

Link to the West Wind Hardwood Inc. Website: https://www.westwindhardwood.com/

This is what the website should look like:

Free Inquiry Plan

For my free inquiry project I have decided to make a side table out of a live edge slab of wood. For the wood type I am contemplating using Douglas Fir (Pseudotsuga menziesii), Red Cedar (Thuja plicata), Yellow Cedar (Cupressus nootkatensis), or possibly Western Maple (Acer macrophyllum). I have many options because I am concerned about the availability and price point of the actual slab, I left myself open to options, so I can find the best price point for the piece I will purchase. This will not be a regular side table. My family and I are avid cribbage players, the first time I played crib was with my grandfather, he taught me the ins and outs of the game. My grandfather is in his 80s currently and I wanted to pay a tribute to my grandfather for introducing me to the great game of cribbage. So, I have decided for this side table I will create a large cribbage board that is the size of a large side table. The small cribbage boards that you can purchase at many stores are nice for travelling and playing on a table-top but I want to build something that is stationary and will be a centerpiece on our outdoor patio.

The Plan: 

  1. Procure the piece of wood
  2. Hand plane
  3. Sand
  4. Drill holes for the cribbage board
  5. Some personal touches (for my grandfather)
  6. Potentially epoxy the piece to make it rectangular (still thinking on this one)
  7. Sand again
  8. Finish with stain or clear coat

For this piece I want to finish the top and see what the finished product looks like before I decide on the base of the project. I am thinking either a nice stump or some drift wood pieces made into legs for the supports on the bottom. I could also go a different route with a nicely welded metal base or perhaps copper piping would look nice for a nice steam punk look. That decision will be made closer to when the top is finished, so I can match the bottom to the top.

Ideas: 

Live Edge Top

Image From: https://imgur.com/gallery/JcdL9rX#I9cu6t0 (mikeytreno)

Copper Piping Legs

Small table, oak worktop offcut

Image From: https://www.pinterest.ca/pin/508343876694060692/ (Pete Whelan)

Drift Wood or Stump for Legs

Double Stump Rustic REAL Wood Dining Table

Image From: https://logfurnitureplace.com/cedar-lake-solid-wood-double-stump-

Powered by WordPress & Theme by Anders Norén