ED Tech 336 Blog

Month: October 2020

Sanding and Marking the Crib Board

Tools Used

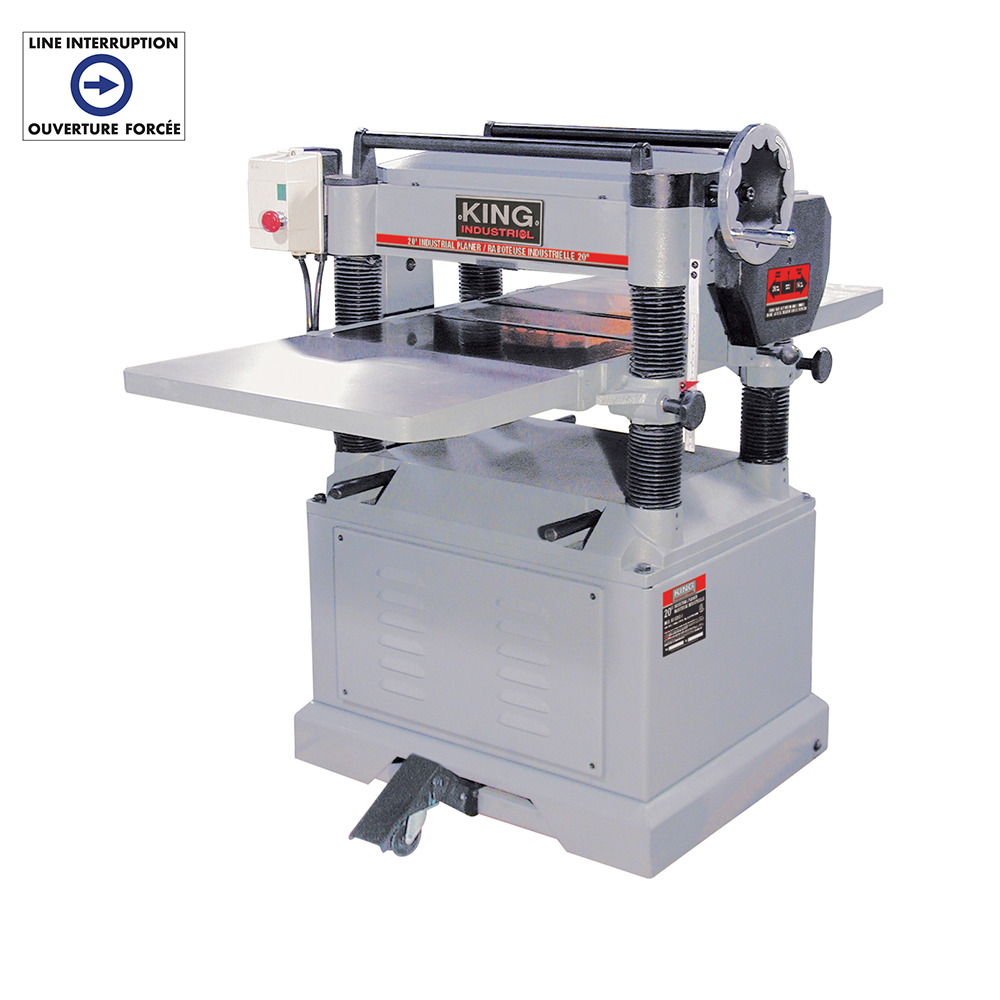
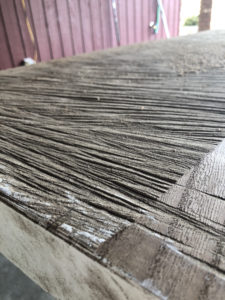
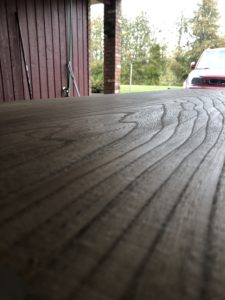
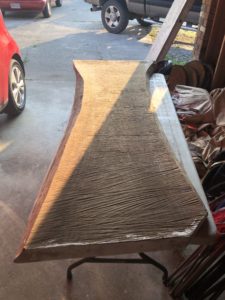
For this step of the project I used an industrial thickness sander (at my brother’s shop) and an orbital sander. An industrial thickness sander is a machine that has a track that carries the piece of wood through the machine. Above the track there is a sanding belt, this machine allows me to sand more material off of the slab than an orbital sander would. After using the thickness sander we used the orbital sander with a finer grit of sand paper to make the slab smooth, the finer the grit of sand paper the smoother the slab becomes. In the thickness sander we used a grit of 60 and then 80, we then switched the belt out for 120, the numbers refer to the size of the abrasive materials on the sand paper. After we were done using the thickness sander we used the orbital sander to finish it up a little and make it a bit smoother with 150 grit. This process made the wood smooth enough to mark where I will be drilling the holes for the cribbage board.


The Slab Running Through the Thickness Sander

My Little Brother Sanding the Slab

Drafting the Cribbage Board

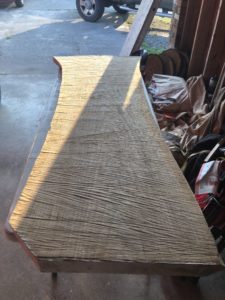
With the slab smoothed enough to draw on the face I marked out the cribbage board area and where I will be drilling the pegging holes. Because of how large the cribbage board is going to be I could not find a stencil online to simply trace, because of this I had to mark out the playing area myself. I used a left over piece of a baseboard as a straight edge to mark the three rows that are on a cribbage board. I made the length of the lines so that between each pegging point is 3/4 of an inch and every five pegging points there is a larger space to make counting easier for the player, I made that gap 2 1/2 inches long. This was somewhat easy, the difficult part was drawing the turns on the crib board. I had to free hand these, I am hoping when I do drill the holes it looks okay. Next week I will be drilling the holes, cutting the ends of the slab and finishing sanding.

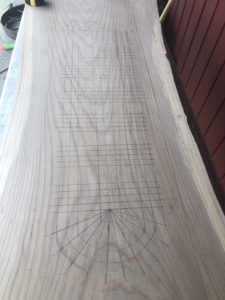
The Whole Playing Area Marked

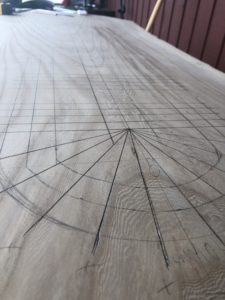
The First Corner of the Cribbage Board

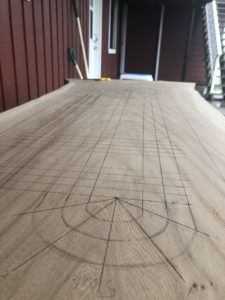
The Second Corner of the Playing Area

EdCamp

You may be wondering to yourself what an EdCamp is. Well and EdCamp is  professional development for educators by educators, they are informal sessions run by educators, anyone can present and the focus is on collaboration. I found a great blog on https://www.edutopia.org/ about EdCamps written by Kristen Swanson, I have included a snapshot of her explanation on what an EdCamp is:

Kirsten Swanson’s Explanation of EdCamps. Retrieved From: https://www.edutopia.org/blog/why-edcamp-kristen-swanson

In our EdTech course we ran a small EdCamp via Zoom, this is how we did it:

  1. Students posted topics they were interested in talking about on a Google doc
  2. Students voted on which topics they would like to be in a group for discussions
  3. The class was broken into groups dependent on which topic they voted for
  4. Group discussions began and ideas flowed
  5. Each group took notes on a Google doc so other groups could read what they were discussing if they were interested

My group discussed mental health and connection in a virtual world: zombies. I do not want to write down everything we discussed in the group discussions, so I will give a brief synopsis and my thoughts. In our group some topics that we discussed were about how difficult Zoom classes have been and the virtual world we are living in during the COVID-19 pandemic, one of my classmates referred to it as a virtual hellscape. Some the main themes were regarding the lack of human interaction each one of us has endured during the pandemic. We found that we are more connected to people when we see them in person, we can see their body language, eye contact, and simply going for a coffee at Biblio after a tough lecture. All of these things are compounded by being inside online for class and almost all of our assignments are done online now too. We discussed some possible remedies like going for walks between classes, stretching, or exercising, we did not solve any world problems but was it ever nice to just talk to others about concerns I had over mental health and some possible remedies. I do not think the idea of EdCamps is to solve all the issues in education but to discuss them and gain insight from your colleagues on so many topics. I thoroughly enjoyed the online EdCamp and will definitely be attending EdCamps in the future.


What is Planing?

It was brought to my attention by a peer that not everyone reading my blogs has the background knowledge of wood working. People reading the blog posts may not understand the terminology that I am using to discuss the processes of making my project. Before I go any further with my Free Inquiry Project I want to dedicate a blog to explain some techniques and terminology that I have used and will use future posts. From this point forward if I use a specific term I will spend time to explain the term and its relevance.

Planing

Before you sand a piece of wood sometimes it is necessary to plane the wood if it is extremely rough or uneven. In the case of the slab I purchased it was extremely rough from the saw marks and very uneven, so it was necessary to plane the piece. There are few different types of planers there is a planing manual hand planer, an electric hand planer, and a planing machine. The purpose of planing is to create a smooth surface and to remove larger amounts of material than a sander. The electric planer and planing machine use a rotating blade to remove material whereas the manual planer has a straight blade with a smooth bottom and a grip on top to run it over the surface of the wood.

Here are the examples of the three types I have mentioned:

Plane (tool) - Wikipedia

Hand Planer – From Wikipedia, https://bit.ly/2H6jeDM

Mastercraft 6.3A Portable Hand Planer Canadian Tire

Electric Hand Planer – Image From Canadian Tire,  https://bit.ly/2H9Y9rF

Industrial Planer – Image From King Industrial, https://bit.ly/3k50zGM

The type of planer I used was the hand held electronic planer in the second photo, the piece of wood I have is too large for the manual hand planer and too wide for the industrial planer that is at my brothers shop. The handheld electronic planer was the only optional that was suitable for this project. The planer I bought is only 3 1/4 inches wide so planing the wood was tedious but definitely easier than using a manual planer.  My next blog will be discussing the sanding process and the rough draft of the layout for the crib board.

Jeff Hopkins Q&A and PSII

What is PSII?

PSII stands for the Pacific School of Innovation and Inquiry located in Victoria, British Columbia, it was founded by Jeff Hopkins in September 2013. At PSII the curriculum is built on personal curiosity and is completed through inquiry based learning. What is this you may be asking? Inquiry based learning is personalizing the learning experience, students are allowed to choose a topic they are interested in and research the topic throughout the term. As they move throughout the term educators work with the students to set goals and track the accomplishment (or not) of these goals. The end product is quite stunning, students are engaged in the inquiry as they are researching about something they are intrigued by, not a prescribed curriculum.  To explain exactly what PSII is and what they do is not completely doable via the mode of blog, you can visit their website here to explore for yourself if you are interested.  Below is a TEDx talk Jeff Hopkins did on inquiry based learning:

Our Q&A with Jeff Hopkins

In this section I just wanted to discuss some discussions that occurred in my classes question and answer period with Jeff Hopkins, the founder of PSII. Jeff was asked about the assessment of students at PSII, I could only imagine how  concerned parents wanting their child to go to university would be about assessment. At PSII they work with the student for their assessment, the educators have assessment meetings with the students almost daily, they have a list of competencies from the B.C. curriculum that must be met. The educators work with the students to ensure they are meeting these competencies  by accomplishing their goals and tasks for the inquiry projects. The difficult part is to take their assessment process and match it up to the B.C. curriculum and marking, but they manage to do it, and they are often audited to ensure they are doing it properly. I found one of the most interesting points we discussed was “Who is PSII good for?” EVERYONE. This is how people learn, by inquiring for themselves and getting help when they need it, having outside resources when they are stuck, but actually inquiring and searching for yourself is where you learn. It is difficult to let go of the old system when it has been entrenched for so long and people have been told they have to do things in a certain way. If people gave it time it can work, it would be a complete culture shift but it is possible. I found the talk very interesting and it really opened up my pedagogical thinking to new ideas. Since that discussion I have been thinking of ways to implement inquiry based learning into my future classroom. It is really hard to do PSII any justice attempting to explain their process in a blog, so I do encourage you to visit their website and explore for yourself.


Fun with Screencastify and H5P

Screencastify

This week in EDCI 336 we did a workshop on Screencastify and H5P, I actually enjoyed this workshop. For people that do not know what Screencastify or H5P is I will explain what both of these platforms are. Screencastify is a Chrome extension that allows the user to record their computer screen for up to five minutes on the free version, while recording your screen you can also talk over the video explaining what you are doing on the screen. I think this tool can be useful for showing students how to use a specific website, for example it could be used to show students how to use the University of Victoria’s library website to find peer reviewed articles. The website is not necessarily intuitive, specifically when it comes to the advanced search methods, creating a video about how to use advanced search methods and how to find exactly what you are looking for would be a great video for students (perhaps a grade 12 History class before they write a research paper).

Screen Capture of Screencastify in the Top Right-hand Corner

H5P

H5P is short for HTML5, it is a plug-in that allows the user to create and run interactive content. The way we used it in our workshop was to create an interactive video, the video I created has multiple choice question in the middle of the video. Personally mine is quite silly but I simply wanted to showcase how the programs could be used. At the end of the video there is another multiple choice question to summarize the content that was demonstrated in the video. I believe this is a great way to engage future students in some content you are trying to show them. As a teacher you could create interactive videos about a topic you are going to cover in a given class. Personally I have some ideas of making funny videos about topics that I would cover and creating interactive videos with multiple choice questions to ensure the students are actually paying attention. Overall, I think this extension and plug-in will be quite useful in the future. I have included my H5P video I created for the workshop below.

Hand Planing the Slab

“Hand” Planing the Slab

As you can see I put quotation marks around the “hand” in the title, this is because I used an electronic hand planer, not an original hand planer which would take much longer than the method I used. Unfortunately the slab I have is too big to run through the thickness planer at my brothers shop, that would be the easiest method, however, that is out of the question. Before I do anything I want to get rid of the band saw marks that have carved up the slab (First Image), the band saw marks are quite deep and obviously make it hard to create a flat surface. This process took a few hours to really make sure all the marks are removed.

The Saw Marks on the Left and the First Pass with the Hand Planer on the Right

This is a Quick Video of Myself Planing the Slab

The Surface of the Slab After Being Planed

Now that the slab is relatively smooth I can begin to create a level surface on both sides of the slab.  In order to make a level table I need to start with a perfectly flat table-top. I have given this quite a bit of thought as to how I can do this, I am thinking that I may have to create a stand that I can place the slab on. The stand will include rails on either side of the slab, these rails will act as glides for the jig I will build to run a router over the slab to really ensure the slab is flat. This is just a possible solution I may have to use if I cannot think of anything else. Here is a picture of a similar setup that I would have to build:


My Digital Footprint and Trello

My Digital Footprint

This week our readings, videos, and weekly meeting on Zoom were about online citizenship. I had not given this concept much thought, I use the Internet every single day for social media, school work, and leisure, yet, I had never given thought to my presence online. I mean my morals I believe are in a good place and I do not post things that may be perceived in a bad manner but I still never thought about it. I see some people on my Facebook feeds posting inappropriate content on the regular and often ignore or even delete those people from the application.

Photo by Rochel Maday

After listening to our guest speaker Jesse miller and the conversation that took place after the keystone I had to reevaluate my thoughts on my digital footprint and my online citizenship. Are the things I share or the photos I post or are in are something I want for everyone to see? The short answer is no. After watching Jesse Miller’s TEDTalk I started to realize the power I had by using the internet and social media, the power I had over my own identity, how do I portray myself on the internet. After class, I went to all of my social media accounts and deleted photos I did not want future employers and students to see and I changed my privacy settings. The video and discussion really changed my perspective of my online citizenship and my digital footprint that I was leaving.

Trello

This week we were also introduced to Trello. This application allows us to create boards and lists to keep track of our blogs as well as our free and guided inquiry projects. The Trello board allows you to grab and move pins from one list to another, for example I moved this week’s blog posts from the “To Do” list to the “Completed” list, I can then create a Week 4 Blogs pin and place that in the “To Do” list for this upcoming weeks tasks.

Photo From: Trello – My Trello Board

I quite like the layout and this application also allows for Rich to view what we have to do and what we have completed, this is a nice feature because he can hold us accountable to the tasks we have set for ourselves.

First Steps of the Free Inquiry

On October 1, 2020, I found the slab of wood that I will use to build the table. I have a friend that works at West Wind Hardwood in Sidney, B.C., I messaged him and asked if they had any nice slabs of maple or cedar in the price range I had allowed for myself. He told me they had a six-foot-long, twenty-one inch wide and three inch thick piece of maple that I would be able to purchase. So I called West Wind to place the order so the piece of wood could be pulled from the inventory, however, when I called the slab I was calling about did not actually exist. The person on the phone informed me that the dimensions I was describing to him were for a piece of elm not maple. I told him I would call back in a bit after I did a bit of research on elm wood for inspiration and to research about the workability of the wood. After my brief research I decided that based on the price, the time crunch, and the inspiration I saw I would buy the piece despite it not being any of the species of wood I wanted.

Here are the pictures I took of the slab when I brought it home:

Over the next week I will be taking the slab to a work shop to flatten both sides. I would use a hand planer but feel that if I have the access to a shop I should use that resource instead of making it more difficult for myself. After the slab is flattened I will begin to sand it and map out the cribbage board area using a stencil to ensure accuracy of the holes that will be drilled. I am really looking forward to working on this project. I will also provide a link to West Wind Hardwood where you can purchase unique woods for your own projects.

Link to the West Wind Hardwood Inc. Website: https://www.westwindhardwood.com/

This is what the website should look like:

Powered by WordPress & Theme by Anders Norén