Lowell McDonald's Blog

ED Tech 336 Blog

Group EdTech Inquiry

How Can Technology Help Shy Students in the Classroom?


For our edtech inquiry project we researched the topic of “How can technology help shy students in the classroom? And what are the implications both positive and negative of the use of these technologies?” As soon to be teachers, we thought it would be an important question to look at as we will be looking for ways to include all students in our future classrooms. Looking at how technology can help include and engage shy students is an important topic for us to inquire because it may provide us with some solutions and tools to help us as we begin our careers. 

The first technology we looked at was student response systems. According to Sherwood Bishop in The SAGE Encyclopedia of Educational Technology a student response system is “electronic, generally wireless, means of communicating between instructors and students” (2015). An example of a student response system would be the iClicker, which many first year university students have used as a means of participation in the class. The student response system allows for students to answer questions by a press of a button on a clicker (multiple choice questions) and can be displayed in front of the class via projector, the answers can be anonymous. 

There are other technologies that we discuss later that can allow for written responses. Our focus is on how these technologies can help shyer students in the high school classroom. Most of the academic research that we found focused on university case studies, however, we believe the findings from the articles can be applied to the high school classroom. In order to keep the blog post shorter we will try to avoid the procedural steps of the articles we will mention, we will leave the citations at the end so if you feel so inclined you may read the studies for yourself. 

We looked at an article written by Jeffrey R. Stowell, Terrah Oldham, and Dan Bennett titled Using Student Response Systems (“Clickers”) to Combat Conformity and Shyness. The article is a study addressing how trait levels of classroom shyness can influence conformity when students answer opinion questions in different ways. The study also addresses use of clickers by shy students as opposed to raising their hand in class to answer questions. We focus more on the aspect of shyness and answering questions in class instead of focusing on the conformity aspect of this study, however, it is an interesting aspect as anonymity allows for students to express their real feelings without judgment or being “called out”. The study conducted found that students were more likely to conform when using hand-raising to respond to the questions, “conforming” meaning responses were similar. In contrast, they found that using keyboards to respond produced greater variability in answers to opinion questions. Thus, using keyboards resulted in less conforming answers by students. The study also found that students “who typically experience shame and anxiety in class felt shame and anxiety in class felt more uncomfortable raising their hands and would prefer to use keypads to answer
” (Stowell et al., 2010, p. 139). They focus more on the conformity part of the study but the students who are more shy had the opportunity to answer questions without the anxious feeling of answering in front of the entire class.

We have only discussed one study suggesting that student response systems can help shy students in the classroom but there are many more (see Ulbig, S. G., & Notman, F. 2012 or Florenthal, B., 2018). The articles mentioned only discuss clicker and keyboard responses, it is not feasible for high school students to be buying clickers for classes. So, we want to discuss a technology that can be used by high school teachers using student cellphones and devices that may be provided by the school. For instance Esquimalt High School has Chromebook carts so teachers can use Chromebooks for certain class activities. 

Slido is an online tool that we thought was a great way to assist the participation of all students in class, and in particular shy students.. Slido is an online interactive word cloud generator, whereby a question can be posed to students and they can answer using their own cellphones or technology provided to them. This is a great way to get students thinking about a specific subject and to get students who do not usually participate in large group discussions a way to voice their opinion using potentially only a single word. Slido is simple to use for both the creator and the participant, and as an educator you can use it for free. You simply create a poll, pose the question and students use the QR code or the event code to gain access and input words that they think are associated with the question. We have included images of a demonstration so you can see how it works.      

Figure 1: The First Slide so Students can use the QR Code or Event Code to Join

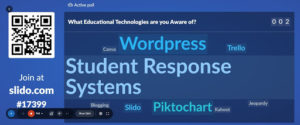
Figure 2: The Word Cloud Being Generated From Student Responses

Another technology that can help shy students in the classroom is blogging. With many classes online during the COVID-19 pandemic there has been a massive increase in the use of blogging in schools. We think blogging allows shy students to contribute to discussions without feeling the pressure of speaking out in class. Being a shy student myself, I tend not to speak out in class until I have had time to collect my thoughts and articulate a way to approach a conversation. Chad Reid says that “Shy students don’t speak up in class for fear of judgment, ridicule, and appearing unintelligent” (2020). By allowing students to use blogging as a way to have in depth conversations may give shy students an opportunity to engage in class without that anxiety. Through blogging students have time to think about what they want to contribute to the conversation instead of being put on the spot. Reid also says that “Participating in online discussions helps quiet students gain the confidence to share their ideas and opinions without worrying about what others think” (2020). The confidence gained online through discussions on blogs students may actually start participating in the classroom. Matthew Lynch believes that “Most students will gain confidence from repeated interactions online and will eventually start participating in class” (2017). 

As a shy student the use of blogs has really helped me explain my thoughts on concepts in class. I hate speaking out in front of my colleagues and having the ability to use blogs to participate in class discussions is really a helpful tool for me. Some useful websites for creating blogs for students are WordPress, Edublogs, or other Learning Management Systems. Some Learning Management Systems and blogging websites are more intuitive than others, depending on the grade level you are teaching you will have to assess the platform you will use. I personally like WordPress, here is the blog I have created for EDCI 336:


I have also included a video to introduce students to blogging if you plan to implement it into your classroom!


When we were teenagers, most of us can remember how important it was to us what our peers thought of us. For most of us, having to stand up and present in front of our peers was painful, and for shy kids it was likely tenfold. It is true that many students will have to do some form of presenting in front of others in their ‘adult life’, we also need to remember that the methods to present ones ideas and work can be done in a multitude of ways. As future teachers, particularly for shy students, we need to think about different options for how students can present their learnings differently than standing up in front of the class. A simple solution could be to have the student present only to the teacher, or to the teacher and a few friends, but we suggest that there are a number of other ways as well that can be much better ways for shy or anxious student to show their learning.

Online technology has provided countless tools that allow students to create interesting and sometimes interactive formats for presenting their work. We suspect new ones are being created almost daily and looking through a list we came across, the quality of the tools is highly variable. A teacher can start by giving students a list of online presentation tools that they have already vetted and the students can pick from them. As well, the teacher can also open it up to students to find a tool that they like and use that, allowing the students to have autonomy. 

Two of the most common online presentation tools are PowerPoint and Prezi.  These tools are often used to help a person present, but in most cases the person still needs to stand in front of the class and go over the material. There are other tools, however, that do not require this.

One of these tools is Google Slides and using it to create an interactive virtual classroom. The virtual classroom is a tool that many of us have become familiar with this term and it is a great way to present material that does not require the creator to stand-up in front of the class to present. 

Powtoon is another good tool for students to share their work without having to stand up in front of the class. With the free version of Powtoon only allowing for a three-minute video, it has the added bonus of teaching students to be  clear and concise. I used Powtoon for a previous teaching and technology course and found that to be the case. 

Canva was introduced to us by Rich in EDTECH EDCI 336. Canva helps the user to create many visual representations of their work. The one that has become a favourite for many is the infographic. As with Powtoon, a student has very limited space on an infographic which requires them to be very judicious in their use of words and visuals. 

Wakelet is another online tool that has a lot of different uses, including a way that students can present their curated and critically analyzed content and research findings. WIth having so many ways for students to “present” their work, there is no reason that a shy student (or any other student) must stand up in front of the class. If standing up in front of one’s peers to present is deemed an essential skill, these other ways to present a student’s material can be used as a method to scaffold up to standing in front of the class.

Online games can be a teaching tool to help increase the participation and comfort of shy students in the classroom. One of the tools that we found online that we would use in our future classroom is on an online game of Jeopardy. With JeopardyLabs you can either use one of the jeopardy games already created or you can create your own. Another option would be for students to create their own jeopardy game and have other students play it. How a teacher decides to use it, be it playing in teams or as individuals depends on what is needed in the classroom. Then of course there is the element of how to make the teams and set-up the rules so that it is as inclusive as possible, facilitates learning, is fun and meets the other goals the teacher has for using it. 

There are at least a couple of tools that although they are not games add a game like element to the classroom. Random Name Picker and Wheel of Names allow a teacher to pick a student as the ‘winner’ in a completely random way.  A teacher at Belmont used this effectively to pick who got the opportunity to choose music for the class. As it can remove the name of the student who ‘won’, it helps to ensure that the same student does not ‘win’ all the time and allows shy students who might not speak up to have their voice/opinion/wishes heard. 

Along with online games making it easier for shy students to participate more actively in class, they can also provide the opportunity for students to experience another reality and develop their critical thinking skills and empathy and compassion. 3rd World Farmer is an online game where players have to manage an impoverished farm in Sub-Saharan Africa. Players are given online ‘firsthand’ experience into the reality of extreme poverty and the challenges faced by people living in these conditions and the incredibly tough decision they make. Playing a game like 3rd World Farmer could be a way to introduce topics like: migration and immigration; world politics; climate change and environmental injustice; moral philosophy and ethics; and economics, to name a few. 

Having lived and worked with farmers in Guatemala for four years in comparable, but not as drastic, circumstances a caution about games like this is that because the situations represented in these games, the people can be depicted as very other and ones we should pity. We must not forget that people who encounter these extreme hardships are full human beings who dream, love, laugh and are incredibly resilient. We often feel a lot of pity for people, I would encourage that pity be changed to empathy and solidarity and the drive for social justice. 

We hope that you find the online tools we have suggested are helpful for you and your future shy and not shy students. 


References

Bishop, S. (2015). Student response systems. In J. Spector (Ed.), The SAGE encyclopedia of educational technology (pp. 684-685). Thousand Oaks,, CA: SAGE Publications, Inc. doi: 10.4135/9781483346397.n281

Florenthal, Bela. (2016). Students’ motivation to participate via mobile technology in the classroom: A uses and gratifications approach, Journal of Marketing Education, 41:3, doi: 10.1177/0273475318784105

Lynch, M., (2017, November 11). 9 Ways that technology boosts student confidence in the classroom. https://www.thetechedvocate.org/9-ways-technology-boosts-student-confidence-classroom/

Reid, C., (2020, November 24). How to reach shy students by engaging them online.  https://www.jotform.com/blog/reach-shy-students-online/

Ulbig, S. G., & Notman, F. (2012). Is class appreciation just a click away?: Using student response system technology to enhance shy students’ introductory American government experience. Journal of Political Science Education, 8(4), 352-371. doi: 10.1080/15512169.2012.729450

Final Wrap-Up for EDCI 336

Well, where to begin. I wanted to create a beautiful crib table, I had big ambitions. Unfortunately it did not quite turn out the way I wanted it to, I started with a large slab of Elmwood and worked with it the best I could. I honestly thought I could complete this project by the time the semester had ended but unfortunately I could not. Sometimes things happen, and we don’t quite finish what we start by the initial date we set. I wanted to create this table because my grandfather taught me how to play cribbage and I thought it would be a nice piece of furniture that we could have had on our outdoor patio. I cannot express how much I wanted to finish this project by the end of the semester but circumstances did not allow for it to happen. The grandfather that taught me how to play cribbage has become quite ill, it has taken its toll on myself and my family and I have struggled with trying to complete the project. I will eventually finish it and give the table to my dad to remember his dad. Here is a picture of how far I got on my project:

Although I was unable to finish the table I really enjoyed the process of making something with my hands for a school project. Being in university it has mostly been about writing essays and papers and using mostly books and technology to complete tasks and projects. This inquiry project has allowed me to use my hands to build something for my family (or at least get a start). My project has also taught me a few things about myself, I have major OCD when it comes to these types of projects, I hate making mistakes, and I love building things. I really appreciated the opportunity to something outside the realm of academia that counted towards are grade in this class. I will complete this project and I honestly think I will continue to blog throughout my career as a teacher, I liked blogging. As someone who is shyer than most blogging has given me the opportunity to speak my mind, it takes me a little longer to articulate my thoughts. Blogging may also be useful in my future classroom, just as a way of formative assessment of students and keep in touch with how they are doing in the class, how they perceive certain topics etc. Anyways, thank you so much for this class, I really did learn a lot and I learned a lot about myself too!

Minecraft Education Edition and Gaming in Education

Minecraft

I have actually had the pleasure of playing Minecraft, I grew up with it as being one of the video games that blew up in the peak of my video game phase during middle and high school. I also recently re-downloaded the game to experiment with it and build a few different things. After watching the pre-class video I was inspired about having Minecraft in education, my niece and nephew are at the prime age for playing Minecraft and love it. Because of this video and the class I am attempting to find a way to use it to help with their at homeschooling during the pandemic. As having the experience of playing it I understand the creative, collaborative aspects of the game but watching the video there is so much more. I never thought of using Minecraft to teach physics or math, architecture and history I understand because you can build examples of famous buildings from around the world etc. There is definitely a stigma about video games in education, but I am going to further explore Minecraft in the classroom and how it can help my niece and nephew. Here is the video we were assigned to watch as a pre-class activity, I found it fascinating:

I have also included a video I found on my own:

Drilling Holes for the Cribbage Board and More Sanding!

This past week I finished drilling the holes in the slab for the cribbage board playing area. I used a handheld drill and a 1/2″ drill bit to drill the holes. For anyone that knows the game of cribbage they know that there is 121 pegging holes, the 121st hole is the winning pegging hole. The other 120 pegging holes are part of the regular playing area. There are three rows so three people can play the game, therefore I had to drill 361 holes in total, so you could say my hands are a little sore.

I learned quite a few things about myself and woodworking this past week. The first thing I learned is that my OCD is real. The second thing I learned is that I am not a professional woodworker and my project will not be perfect and I will have to live with that fact.

What does this mean?

I bought a little tool from Canadian Tire that helps drill straight holes up and down which works perfectly. The problem was with keeping the holes in a straight line on the playing area. Some of the holes I drilled were off-center from the lines I had drawn on the slab. I had also not accounted for the 1/2″ holes that would be created by the drill bit while I was measuring the spacing originally so some of the holes have chipped away some wood (photos below). These little mistakes really frustrate me, I often tend to move to quickly for my own good and miss steps and make mistakes. I keep learning these things about myself through projects, the blogging I think reaffirms these things though, by having to reflect about my learning and the process. The next step of the project will be to finish sanding the slab, stain it, and then create legs for the table. I have an idea of what I will be doing for the legs but I will keep that for another day to explain.

Tinkercad!

In our EdTech 336 class we learned how to use Tinkercad with Rich. For those who do not know what Tinkercad is it is a program that allows users to create 3D images and models in order to be 3D printed. Their website says “Tinkercad is a free online collection of software tools that help people all over the world think, create and make. We’re the ideal introduction to Autodesk, the leader in 3D design, engineering and entertainment software” (Autodesk Inc., 2020). I have included a video from their website here:

In the EdTech class we were able to choose from several exercises to go through and learn the basics of Tinkercad. I chose to go through the game piece exercise in which I made a pawn from a chess game on the program. I thought this was relevant to me because I am thinking about using Tinkercad and creating game pieces for my free inquiry project which is building a cribbage board. The more I think about it the more intrigued I am becoming, with Tinkercad you customize the design anyway you want. I was thinking about creating cribbage pegs on Tinkercad but having different animals on top of the pegs just to add a little bit of personality to the project. Before we were introduced to this program I had not thought of doing this, but now with the knowledge about the program I am thinking I may commit to doing this for my project. Here is me creating my chess pawn on Tinkercad:


Currently, I am in a seminar course at Esquimalt High School and their computer room and teacher actually uses Tinkercad as one of her EdTech tools to teach her courses. Students can create anything they want and print them off, using the 3D printers they have at the school. Learning how to use it ourselves is useful for potentially implementing the use of 3D design and printing into our classes. I think this is really interesting specifically for STEM courses and offering more practical courses and applications at the high school level.

Sanding and Marking the Crib Board

Tools Used

For this step of the project I used an industrial thickness sander (at my brother’s shop) and an orbital sander. An industrial thickness sander is a machine that has a track that carries the piece of wood through the machine. Above the track there is a sanding belt, this machine allows me to sand more material off of the slab than an orbital sander would. After using the thickness sander we used the orbital sander with a finer grit of sand paper to make the slab smooth, the finer the grit of sand paper the smoother the slab becomes. In the thickness sander we used a grit of 60 and then 80, we then switched the belt out for 120, the numbers refer to the size of the abrasive materials on the sand paper. After we were done using the thickness sander we used the orbital sander to finish it up a little and make it a bit smoother with 150 grit. This process made the wood smooth enough to mark where I will be drilling the holes for the cribbage board.


The Slab Running Through the Thickness Sander

My Little Brother Sanding the Slab

Drafting the Cribbage Board

With the slab smoothed enough to draw on the face I marked out the cribbage board area and where I will be drilling the pegging holes. Because of how large the cribbage board is going to be I could not find a stencil online to simply trace, because of this I had to mark out the playing area myself. I used a left over piece of a baseboard as a straight edge to mark the three rows that are on a cribbage board. I made the length of the lines so that between each pegging point is 3/4 of an inch and every five pegging points there is a larger space to make counting easier for the player, I made that gap 2 1/2 inches long. This was somewhat easy, the difficult part was drawing the turns on the crib board. I had to free hand these, I am hoping when I do drill the holes it looks okay. Next week I will be drilling the holes, cutting the ends of the slab and finishing sanding.

The Whole Playing Area Marked

The First Corner of the Cribbage Board

The Second Corner of the Playing Area

EdCamp

You may be wondering to yourself what an EdCamp is. Well and EdCamp is  professional development for educators by educators, they are informal sessions run by educators, anyone can present and the focus is on collaboration. I found a great blog on https://www.edutopia.org/ about EdCamps written by Kristen Swanson, I have included a snapshot of her explanation on what an EdCamp is:

Kirsten Swanson’s Explanation of EdCamps. Retrieved From: https://www.edutopia.org/blog/why-edcamp-kristen-swanson

In our EdTech course we ran a small EdCamp via Zoom, this is how we did it:

  1. Students posted topics they were interested in talking about on a Google doc
  2. Students voted on which topics they would like to be in a group for discussions
  3. The class was broken into groups dependent on which topic they voted for
  4. Group discussions began and ideas flowed
  5. Each group took notes on a Google doc so other groups could read what they were discussing if they were interested

My group discussed mental health and connection in a virtual world: zombies. I do not want to write down everything we discussed in the group discussions, so I will give a brief synopsis and my thoughts. In our group some topics that we discussed were about how difficult Zoom classes have been and the virtual world we are living in during the COVID-19 pandemic, one of my classmates referred to it as a virtual hellscape. Some the main themes were regarding the lack of human interaction each one of us has endured during the pandemic. We found that we are more connected to people when we see them in person, we can see their body language, eye contact, and simply going for a coffee at Biblio after a tough lecture. All of these things are compounded by being inside online for class and almost all of our assignments are done online now too. We discussed some possible remedies like going for walks between classes, stretching, or exercising, we did not solve any world problems but was it ever nice to just talk to others about concerns I had over mental health and some possible remedies. I do not think the idea of EdCamps is to solve all the issues in education but to discuss them and gain insight from your colleagues on so many topics. I thoroughly enjoyed the online EdCamp and will definitely be attending EdCamps in the future.


What is Planing?

It was brought to my attention by a peer that not everyone reading my blogs has the background knowledge of wood working. People reading the blog posts may not understand the terminology that I am using to discuss the processes of making my project. Before I go any further with my Free Inquiry Project I want to dedicate a blog to explain some techniques and terminology that I have used and will use future posts. From this point forward if I use a specific term I will spend time to explain the term and its relevance.

Planing

Before you sand a piece of wood sometimes it is necessary to plane the wood if it is extremely rough or uneven. In the case of the slab I purchased it was extremely rough from the saw marks and very uneven, so it was necessary to plane the piece. There are few different types of planers there is a planing manual hand planer, an electric hand planer, and a planing machine. The purpose of planing is to create a smooth surface and to remove larger amounts of material than a sander. The electric planer and planing machine use a rotating blade to remove material whereas the manual planer has a straight blade with a smooth bottom and a grip on top to run it over the surface of the wood.

Here are the examples of the three types I have mentioned:

Plane (tool) - Wikipedia

Hand Planer – From Wikipedia, https://bit.ly/2H6jeDM

Mastercraft 6.3A Portable Hand Planer Canadian Tire

Electric Hand Planer – Image From Canadian Tire,  https://bit.ly/2H9Y9rF

Industrial Planer – Image From King Industrial, https://bit.ly/3k50zGM

The type of planer I used was the hand held electronic planer in the second photo, the piece of wood I have is too large for the manual hand planer and too wide for the industrial planer that is at my brothers shop. The handheld electronic planer was the only optional that was suitable for this project. The planer I bought is only 3 1/4 inches wide so planing the wood was tedious but definitely easier than using a manual planer.  My next blog will be discussing the sanding process and the rough draft of the layout for the crib board.

Jeff Hopkins Q&A and PSII

What is PSII?

PSII stands for the Pacific School of Innovation and Inquiry located in Victoria, British Columbia, it was founded by Jeff Hopkins in September 2013. At PSII the curriculum is built on personal curiosity and is completed through inquiry based learning. What is this you may be asking? Inquiry based learning is personalizing the learning experience, students are allowed to choose a topic they are interested in and research the topic throughout the term. As they move throughout the term educators work with the students to set goals and track the accomplishment (or not) of these goals. The end product is quite stunning, students are engaged in the inquiry as they are researching about something they are intrigued by, not a prescribed curriculum.  To explain exactly what PSII is and what they do is not completely doable via the mode of blog, you can visit their website here to explore for yourself if you are interested.  Below is a TEDx talk Jeff Hopkins did on inquiry based learning:

Our Q&A with Jeff Hopkins

In this section I just wanted to discuss some discussions that occurred in my classes question and answer period with Jeff Hopkins, the founder of PSII. Jeff was asked about the assessment of students at PSII, I could only imagine how  concerned parents wanting their child to go to university would be about assessment. At PSII they work with the student for their assessment, the educators have assessment meetings with the students almost daily, they have a list of competencies from the B.C. curriculum that must be met. The educators work with the students to ensure they are meeting these competencies  by accomplishing their goals and tasks for the inquiry projects. The difficult part is to take their assessment process and match it up to the B.C. curriculum and marking, but they manage to do it, and they are often audited to ensure they are doing it properly. I found one of the most interesting points we discussed was “Who is PSII good for?” EVERYONE. This is how people learn, by inquiring for themselves and getting help when they need it, having outside resources when they are stuck, but actually inquiring and searching for yourself is where you learn. It is difficult to let go of the old system when it has been entrenched for so long and people have been told they have to do things in a certain way. If people gave it time it can work, it would be a complete culture shift but it is possible. I found the talk very interesting and it really opened up my pedagogical thinking to new ideas. Since that discussion I have been thinking of ways to implement inquiry based learning into my future classroom. It is really hard to do PSII any justice attempting to explain their process in a blog, so I do encourage you to visit their website and explore for yourself.


Fun with Screencastify and H5P

Screencastify

This week in EDCI 336 we did a workshop on Screencastify and H5P, I actually enjoyed this workshop. For people that do not know what Screencastify or H5P is I will explain what both of these platforms are. Screencastify is a Chrome extension that allows the user to record their computer screen for up to five minutes on the free version, while recording your screen you can also talk over the video explaining what you are doing on the screen. I think this tool can be useful for showing students how to use a specific website, for example it could be used to show students how to use the University of Victoria’s library website to find peer reviewed articles. The website is not necessarily intuitive, specifically when it comes to the advanced search methods, creating a video about how to use advanced search methods and how to find exactly what you are looking for would be a great video for students (perhaps a grade 12 History class before they write a research paper).

Screen Capture of Screencastify in the Top Right-hand Corner

H5P

H5P is short for HTML5, it is a plug-in that allows the user to create and run interactive content. The way we used it in our workshop was to create an interactive video, the video I created has multiple choice question in the middle of the video. Personally mine is quite silly but I simply wanted to showcase how the programs could be used. At the end of the video there is another multiple choice question to summarize the content that was demonstrated in the video. I believe this is a great way to engage future students in some content you are trying to show them. As a teacher you could create interactive videos about a topic you are going to cover in a given class. Personally I have some ideas of making funny videos about topics that I would cover and creating interactive videos with multiple choice questions to ensure the students are actually paying attention. Overall, I think this extension and plug-in will be quite useful in the future. I have included my H5P video I created for the workshop below.

Page 1 of 2

Powered by WordPress & Theme by Anders Norén